So this happened today. I have an old grandma time pc with me and I wished to convert it into a Network Attached Storage (or NAS). What to do, the boi isn’t good for anything else. So I hit that power button and saw the manufacturer screen pop up. And then I waited. And waited. Nothing happened. I like a smart ass started looking for a windows recovery disk, only to realize I didn’t have one.
You know what I did after that. I decided that NAS system can wait.
There are people out there whose old grandma PCs are just lying there eating dust. Let’s help them bring the old horse to life. What to do with that they can decide afterwards.

Ultimate Boot CD as Windows Recovery Disk (USB),
So your pc has decided to die on you. All your precious files are locked away in abyss you don’t know where.
And since you don’t know what’s happening, figuring what’s wrong with the thing is adding spice to misery.
Now what you need is a tool to figure what in the name of blue hell is happening.
Ultimate Boot CD is the tool we will be talking about in this post.
Once prepared (as we will discuss) you can use this as windows recovery disk for any pc you would like to diagnose
IMPORTANT NOTE: While it’s been kept up to date as much as possible, many of the tools and drivers in UBCD are geared towards older hardware. So the windows recovery disk finds best usage to those old forgotten laptops and grandma times PC. If you wish to resurrect a modern windows 10 machine, try microsoft’s own rescue tools first.
UBC is one stop accumulation of softwares for all kind of PC rescue tasks.
You don’t necessarily need a CD to carry out the software, a simple USB with storage of 1 GB or more can be used.
So here’s what we are going to do,
Downloading UBCD
Download the UBCD iso from here.
Once downloaded burn the ISO into an optical disk using CDBurnerXP, if you are feeling a little wild and traditional.
Or else do the wise thing and write the ISO onto USB flash drive using Rufus.
Boot from the prepared media
Plugin or insert the media into the target machine. Restart the PC and set boot priority order in your BIOS to boot from USB/CD.
Once done restart the machine and now if everything works well you are going to see this screen.

Check system components
Working out what does what must be fairly clear from the options you will be seeing in front of you.
CPU option will enable you to see the “umph” your processor carries via varied stability tests, stress tests and other challenging benchmarks.
One very nice thing about UBCD for benchmarkers is, UBCD benchmarks results are as close as you can get to the actual bare metal performance of the CPU.
In other words, tests results provide the very direct ground data you can get on the CPU.
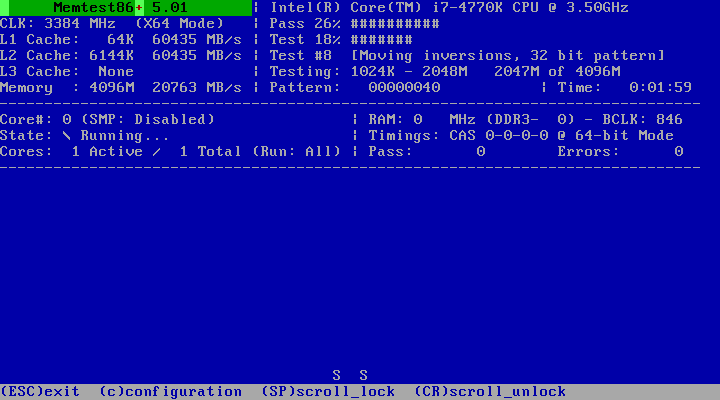
Memory section runs the infamous failure detecting MemTest86+ 5.01 to comprehensively test every byte of your RAM.
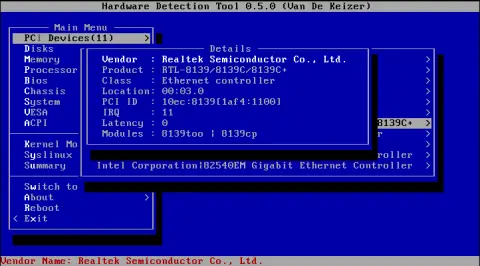
If you don’t know what hardware are you dealing with a quick look into the Hardware Detection Tool into the System menu should sail you through.
Drive Tools
One very specific reason I suggest UBCD as my windows recovery disk is the diverse tools it provides for working, diagnosing and potentially recovering HDDs.
The drive tools are UBCD’s area of specialization.
You will find a whole list of archaic and specific tools to work with in HDD option.
While you will definitely find very specific tools such as EaseUS Disk Copy and HDClone (for disk cloning). In my opinion you maybe served better going with the expert choice : Parted magic.
fair warning though, the version included with UBCD is the final free edition of parted magic. Someone thought it was a good idea to earn from it.
pfrrrrr. Yeah right.
Anyhoo, the version you get will be perfectly adequate for all backup and recovery purposes.
Accessing Drives
Start parted magic from the main menu.
Select the default “Run from RAM” option and arrive at a Linux desktop packed with tools for you to work with.
The first thing that you should be touching here is the file manager.
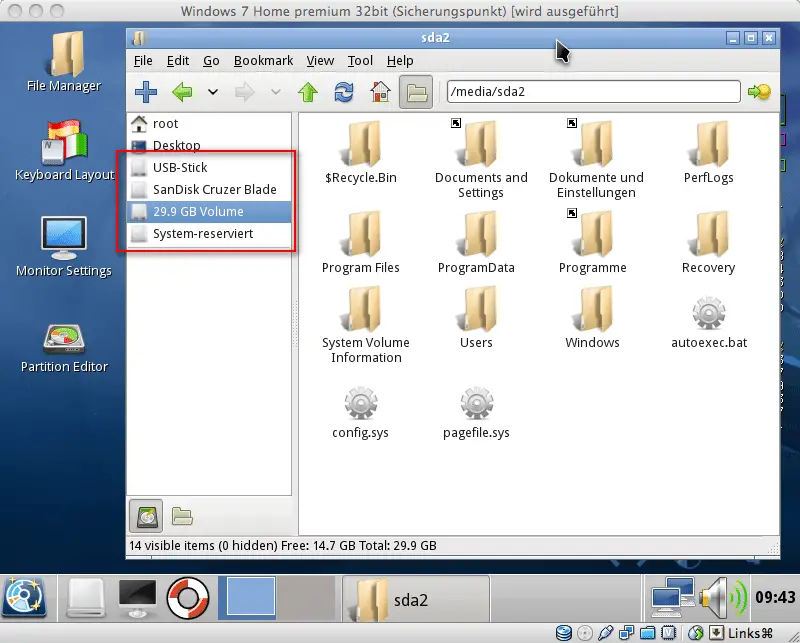
Locate the misbehaving hard drive on the left if that indeed is the problem. Re-mount the drive by right clicking on it.
PRO-TIP : Add the option “ro” to the end of the list in order to mount the drive as read only. This is because we don’t want to create additional problems at this point. Just copy over the important data and jump ship.
You can of course choose the default path if it meets your needs.
You can plug in and mount a separate drive at this point, mount it and copy over all the crap you want.
Cloning and Anti-Virus
The linux app Clonezilla is your best bet for disk cloning.
With no drives mounted fire it up, choose whether you would like to back up to an image file or do a bit-to-bit copy of a drive. select “local_dev” on next screen, plug in your USB drive and you should be done.
Fair warning here, if via thorough analysis you have a slight idea or inclinations suggesting that the drive is failing not because of hardware problems, cloning it is just asking for more trouble.
If that is the case, ClamAV launched via “Virus Scanner” shortcut on the parted magic desktop.
As soon as you start it, it automatically downloads the latest antivirus definitions and updates.
Now if you have mounted the target drive with read and write access, the AV will attempt to clean up the infested drive that might have got infected due to “casual browsing” sessions. 😉
Run the AV before cloning so that the muck doesn’t propagate and you are at peace with the newly cloned drive.
So that was it my dudes, with this post.
If I am being honest I have just scratched the surface of the whole unresponsive pc diagnosis here.
- Check out these other posts here and here to have a comprehensive knowledge on how to diagnose a pc completely.
But here is the deal, what is offered here is all that you need. If you have been patient enough to read the entire post, I am sure you will be able to navigate through all the options UBCD has to offer.
Having said that I understand that still some doubts may creep up while diagnosing.
And having had a lot of headaches in that direction, I feel I have enough experience to help you out. All you have to do is just ask your question in the comments section.
Hell, even if you don’t have one it won’t hurt to say Hi would it. Lol 😀
I will see you in the next one 🙂
Namaskaram _/\_ 🙂

