If you truly value your PC’s performance removing bloatwares should be one of the top tasks in your list.
In this post, I will teach you how to remove nasty bloatwares from your system that cloud your PC resources and affect its performance and speed.
And the most funny part is you won’t ever need most of these apps.
Then why do they exist you might ask.
Money my friend, you see these unwanted app companies go into collaborations with Windows to promote their apps on newly installed system.
When your PC is new that is the time you will explore your PC the most.
And in that window if you allow these apps to stay, that is when you have ensured that you want these apps for the lifetime of your PC.
Thus, benefitting the companies the most.
I am not saying you should not use any of these apps, just use what you absolutely need or it will cost you your system resources.
Luckily, its very easy to get rid of all these bloatwares folowing these simple steps which we will now discuss.
How To Remove Windows 10 Bloatwares That You You Can See And Those That You Can’t See.
Some of these apps are actually quite easy to uninstall using your traditional program uninstallation method from System > Apps and Features.
However, some of these bloatwares are stubborn and you won’t be able to simply uninstall them.
Why you ask?
Because some of the manufacturers of these apps stand to have a profit from them being run in the foreground or background.
And therefore, uninstalling them wouldn’t be in their best interests.
So removing these hidden apps will require some effort but it’s not too difficult to get rid of them.
Identifying And Removing Windows 10 Bloatware Apps
Some applications such as Money, Sports, Candy Rush, Sports etc. can be removed using regular uninstall.
There are several similar apps lying on the start menu of the windows 10 environment.
In order to remove these apps all you need to do is either uninstall them from settings app or simply right click the apps on the start menu and select uninstall.
This will remove the bloatwares that are latched on the surface of your OS.
But your task isn’t complete.
There are many applications that Microsoft considers “important” for core Windows 10 performance.
These bloatwares require the execution of certain commands to be executed from Windows Powershell or a third part uninstaller, which we will learn in a moment.
Running Powershell Commands To Remove Bloatwares From Your Windows 10 PC
So what is Windows Powershell?
Windows PowerShell is an inherent part of Windows operating system that allows you to have greater control over Windows 10 inner operating environment.
It is a command and scripting language similar to command prompt that provides you a wider and in-depth control over your operating system.
Some people like to compare PowerShell and Command Prompt on the basis of extent of control they, but in its core both of them are very different avenues.
Today, we are going to use PowerShell commands/scripts to remove Windows 10 bloatwares from our Windows 10 system.
In order to do this, open the PowerShell environment, by typing PowerShell into your start menu Search.
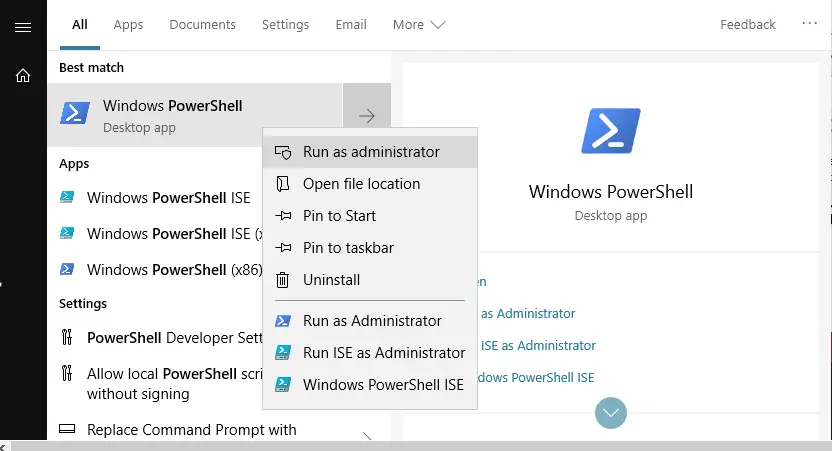
Right Click and Run the application as administrator.
It is important to run the PowerShell as administrator in order to provide it admin access to do fundamental changes in computer which otherwise are not possible by surface level GUI interface.
After this you will have to pick what bloatwares you wish to remove from your system.
Windows PowerShell is capable of removing any bloatware package that you list out, such as Zune Music, Bing Health, News, Fitness, Finance etc.
You can use some or all of these commands to hide the applications mentioned in the inverted quotes.
Get-AppxPackage -name "Microsoft.ZuneMusic" | Remove-AppxPackage
Get-AppxPackage -name “Microsoft.Music.Preview” | Remove-AppxPackage
Get-AppxPackage -name “Microsoft.XboxGameCallableUI” | Remove-AppxPackage
Get-AppxPackage -name “Microsoft.XboxIdentityProvider” | Remove-AppxPackage
Get-AppxPackage -name “Microsoft.BingTravel” | Remove-AppxPackage
Get-AppxPackage -name “Microsoft.BingHealthAndFitness” | Remove-AppxPackage
Get-AppxPackage -name “Microsoft.BingFoodAndDrink” | Remove-AppxPackage
Get-AppxPackage -name “Microsoft.People” | Remove-AppxPackage
Get-AppxPackage -name “Microsoft.BingFinance” | Remove-AppxPackage
Get-AppxPackage -name “Microsoft.3DBuilder” | Remove-AppxPackage
Get-AppxPackage -name “Microsoft.WindowsCalculator” | Remove-AppxPackage
Get-AppxPackage -name “Microsoft.BingNews” | Remove-AppxPackage
Get-AppxPackage -name “Microsoft.XboxApp” | Remove-AppxPackage
Get-AppxPackage -name “Microsoft.BingSports” | Remove-AppxPackage
Get-AppxPackage -name “Microsoft.WindowsCamera” | Remove-AppxPackage
Get-AppxPackage -name “Microsoft.Getstarted” | Remove-AppxPackage
Get-AppxPackage -name “Microsoft.Office.OneNote” | Remove-AppxPackage
Get-AppxPackage -name “Microsoft.WindowsMaps” | Remove-AppxPackage
Get-AppxPackage -name “Microsoft.MicrosoftSolitaireCollection” | Remove-AppxPackage
Get-AppxPackage -name “Microsoft.MicrosoftOfficeHub” | Remove-AppxPackage
Get-AppxPackage -name “Microsoft.BingWeather” | Remove-AppxPackage
Get-AppxPackage -name “Microsoft.BioEnrollment” | Remove-AppxPackage
Get-AppxPackage -name “Microsoft.WindowsStore” | Remove-AppxPackage
Get-AppxPackage -name “Microsoft.Windows.Photos” | Remove-AppxPackage
Get-AppxPackage -name “Microsoft.WindowsPhone” | Remove-AppxPackage
With the help of these commands you will be able to hide these pre-installed apps from your view without deleting them from the system.
You can do this with apps that you think you would require at a later date.
However, if you would like to completely dissipate any of these apps from the system this is what you do.
Deleting Windows 10 Bloatware Completely From The System.
In order to completely delete or obliterate any of these bloatware from Windows 10 this is what you need to do.
You need to execute the DISM command for complete removal of any of the unwanted bloatware.
DISM is short form for Deploying Imaging Service and Management. DISM is a set of very powerful commands and tools that are used to have deep developer and service controls of Windows environment.
In our case we are going to use DISM to remove unwanted applications from our system and render it more resource friendly and responsive.
This command will layout the entire list of bloatware currently active on your computer.
DISM /Online /Get-ProvisionedAppxPackages | select-string Packagename
This will return a list of apps using your system resources that can be potentially wiped from your computer
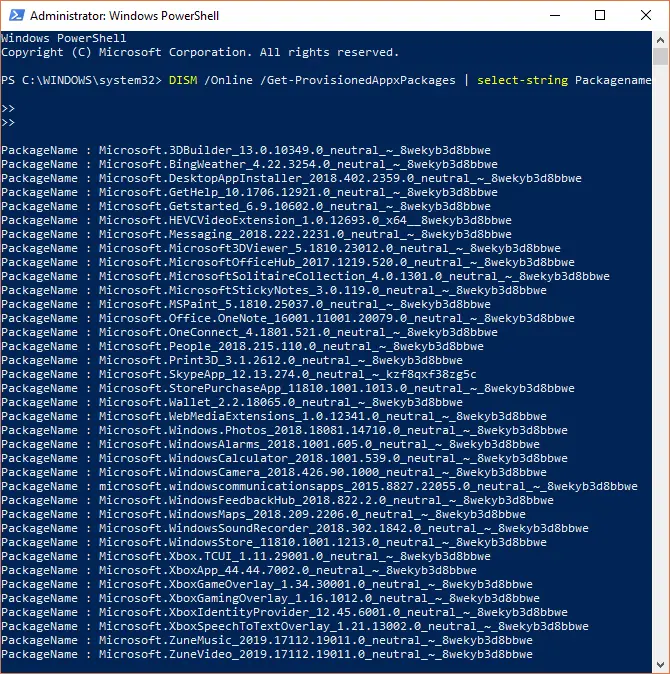
In order to remove any of these apps, use the following command.
DISM /Online /Remove-ProvisionedAppxPackage /PackageName:PACKAGENAME
Replace PACKAGENAME with any of the application name that you wish to remove from the list you just laid out.
Keep repeating the process until you have removed all the bloatware you don’t want in your computer.
Once done, close all applications and restart your computer.
You should have a bloatware free PC now.
Bloatware Remover Third Party Tool For Windows 10: Windows10Debloater
While the methods discussed above are effective but not all windows users will be comfortable using them.
For all those people who don’t want to get into the geeky, techy stuff, don’t waorry I have something neat and easy for you too.
The Windows10Debloater is a PowerShell Script/Utility created by Sycnex presented in a user friendly sense that you can use to remove all additional and potentially unwanted apps and packages from windows 10 environment.
Download Windows10Debloater By Sycnex from here.
This simple one-click app is capable of bringing your windows 10 to absolute bare ensuring there are no unwanted apps running in the background hogging your system resources.
This means the app will also remove certain apps that you may want now or in the future like Windows Netflix and PowerBI.
However, you can always get them later if you want. I generally like to keep my system clean and start installing apps later if and when need arises.
When you download the script from the github page (top right corner, click clone or download and download as zip), and extract it on your PC, you will see two different versions of the script.
- Windows10Debloater: a barebone script that runs in the background and carries out all the tasks silently in the background.
- Windows10DebloaterGUI: a user-friendly interface with the option of selecting/reverting bloatware and tweaking certain privacy settings.
So, with this step what you are really doing is automating the all the steps we did in the previous sections of this post.
If you happen to choose this option of removing bloatware from your Windows 10 PC, and if you later decide to get back some of the packages that you uninstalled here is what you do.
Either don’t go through the automated step at all, manually remove only packages that you don’t want using the steps discussed in the previous section.
Or install the required apps later after running the script.
Either ways the manual task on individually choosing and deleting/installing is there but it’s a necessary task you will have to undertake.
For me personally, when I have a fresh PC on my hands, I really don’t care. I want a fresh clean system and don’t want anything to cloud my resoures without me knowing about it.
Because here is the thing.
Most of these apps don’t remove static.
They always update, grow their database and slowly start consuming more resources as time progresses.
That is precisely why all computers slow down over time. Doesn’t matter how powerful they are.
So I want the slowing process slowed as much a possible.
I recommend you do the same.
Still, choice is yours.
Is It Really Important To Remove The Bloatware On Windows 10?
In short, if you value your system’s performance yes.
Understand, a bloatware is a piece of software that is always running.
You may not necessarily be actively using it but it is there on the background using up your system resources and data and not to mention storage space.
Choosing not to remove bloatware means potentially subjecting your computer to clouding your system resources, affecting speed, responsiveness and smooth workflow.
While it would be wrong to say all of these softwares aren’t important but you must be able to have conscious choice and control over what becomes a part of your Windows 10 environment.
There is no need to label all these apps as absolute trash. But if you don’t need any of these apps, there is actually no reason for you to continue allowing them to run on your PC.
Anyways, whatever decision you choose to arrive at you now have the necessary tools to take care of bloatware and potentially obliterate them if you wish to.
Hope you enjoyed reading this post as much as I enjoyed making it.
Stay around and subscribe for awesome reads like this getting right into your inbox.
Till next time.
Tada!.

